


How to Change a Car Battery
|
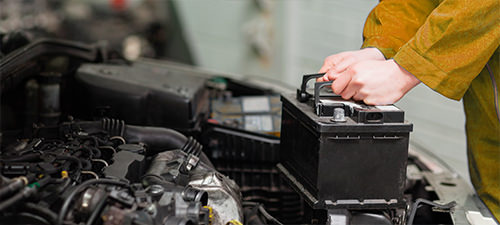
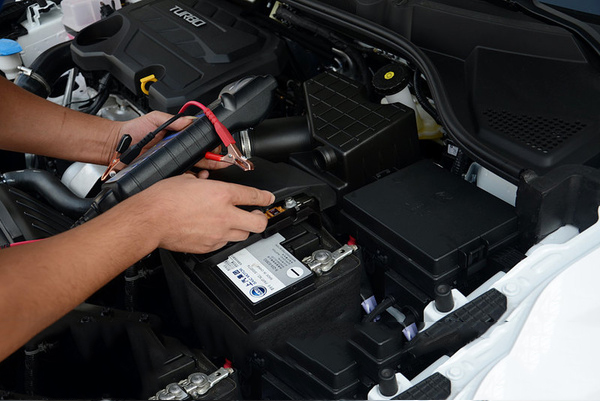
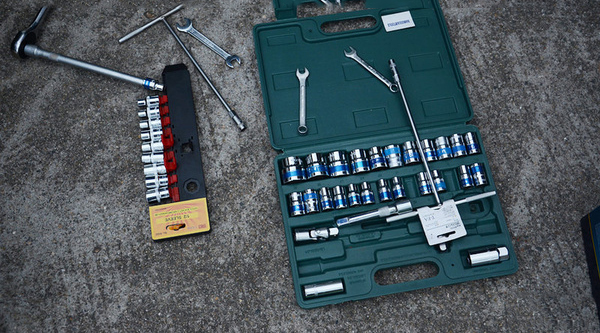
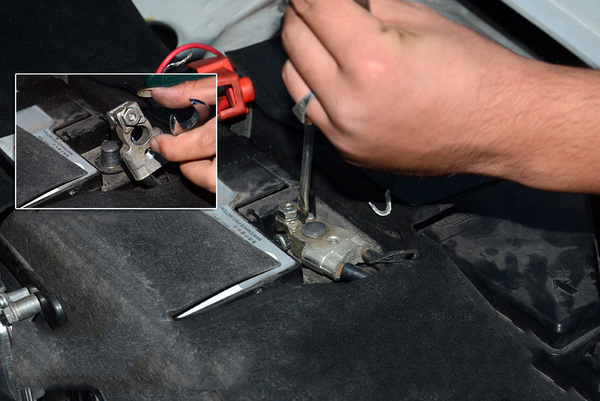
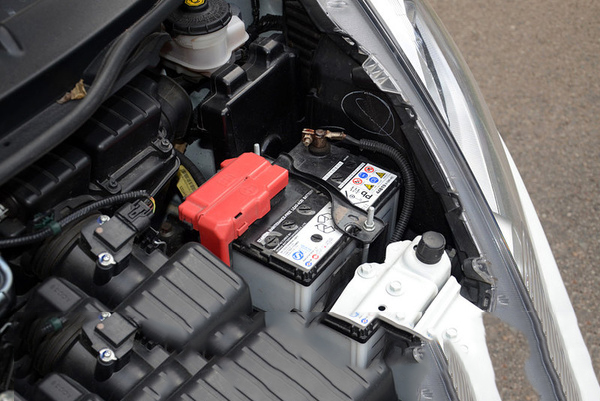
In the battery maintenance sharing session, Valta's experts have extended some knowledge about the battery and what should be paid attention to during normal use. In fact, the battery is not deliberately used for maintenance, just need to develop some good car habits. The battery should be used for more than two years. The service life of a typical car battery is 2-3 years, and the original battery of a new car can be used for more than 3 years. So if your battery has been in use for almost two years, be aware that its useful life may have expired. At this time, it should be checked a lot, and the test should be done in advance, and the problem should be solved or replaced as soon as possible to avoid the sudden loss of the battery in the process of using the armpit. First, it's a good idea to see if your battery needs to be replaced, or if you can use good cleaning results. Over time, the sulfate produced by the lead discharge of the battery will accumulate white matter on the terminals, preventing the battery from being recharged during use. You can remove this sulfate by simply baking soda and an aqueous solution. Make sure the car is turned off by removing the key from the ignition switch and brushing the solution onto the sulfate to loosen the deposit. After the terminal is clean, try to ignite. If the car starts, it should be able to charge itself, after all, you may not need to replace it. Tools Needed to Change a Car Battery If your battery is completely drained, consider having a professional do the work for you. The battery can be heavy: the average car battery contains more than 24 pounds (10.8 kg) of lead, excluding other components. Most auto parts stores offer a free battery installation when you purchase a new battery. If you've already created the baking soda and water solution you need to clean your terminals, keep it handy. You'll want to give the terminal cables a more thorough cleaning. If not, then go ahead and whip up a batch and drop a clean paintbrush into it for later. Break out your toolbox and select a few of the tools you'll need. The battery terminal cables are held fast around the battery terminals by nuts and bolts. This means you'll need a crescent wrench, an adjustable wrench, vise pliers or a socket wrench. Select a 10mm (0.4 in) wrench or socket, as most car battery cables have this size nut attached. Grab another pair of adjustable pliers to hold the bolt head in place as well. It may sound funny, but you'll also want to bring a hammer with you. A gentle tap or two can help loosen a stubborn terminal cable from the terminal post. It's also a good idea to invest in a battery terminal cleaner. This handy and inexpensive tool is designed to brush away corrosion from the terminal posts and the end clamp of the cables. It also primes the posts of your new battery for a better connection to the terminal cables. If you have a good narrow metal wire brush, that can do the trick as well. While you're picking up a terminal cleaner, spring for a can of corrosion protection, which will help prevent sulfate buildup in the future. Lastly, bring along a pair of sturdy gloves and safety goggles. Batteries can be dangerous, (as we'll see in the next pages) and protecting your hands and eyes is a good idea. Also, if you have a Styrofoam cooler, take the top along to serve as a safe and handy tray for your tools and don't forget to bring along a few rags. Got everything together? Good. It's time to go outside again. Preparing Your Car for a Battery Change First and foremost in preparing your car for a battery change is ensuring that the battery isn't receiving any power from your engine. You may have found that your battery needs replacing after it failed to turn over, so your keys may still be in the ignition. If so, remove them. Without the keys, your car's electrical system shouldn't be active, which will reduce the chance of a spark or shock while you're changing your battery. If you've already brushed on the baking soda and water solution to the terminals, you're ahead of the game. If not, go ahead and clean the terminals as fully as possible. Removing the sulfate deposits should make it easier to unscrew the nuts from the bolts on the cable ends and from the posts. Gently knock the posts and cables with your hammer to break up the deposit. Then brush on the baking soda solution and finally wipe it away with a rag. Once the battery is cleaned, inspect it for cracks where acid might escape when you remove it. Make a mental note of these places so you can avoid placing your hands near them during removal. You might also want to place duct tape over any cracked areas to provide a layer of protection -- albeit a minimal one. Lay your tools out on the ground. If you have a cooler top, you can lay it on top of your car's engine, but only if your car is completely cool. Otherwise, the Styrofoam may melt. Using Styrofoam as a tool tray will help prevent any accidental electrical charges that can be generated if your metal tools touch your car's metal surfaces while you work on the battery. Your battery is cleaned, you've searched for cracks and your tools are laid out. It's time to remove your old battery Removing Old Car Batteries Finally, we get to the good part: removing the old battery. Remember that this is the most dangerous stage in the replacement process. Cracks and corrosion in the old battery can allow acid to leak out onto your skin, which can be unpleasant to say the least. While the car's ignition is off, the battery can still produce an electrical charge (and even an explosion) while the terminals are connected. In other words, be very careful while removing the battery. To start, loosen the nut from the bolt that holds the terminal cable to the negative post on the battery. Use your wrench or pliers to turn the nut in a counterclockwise direction. Hold the bolt head in place using another pair of pliers or wrench. Once loose, carefully slide the end clamp from the post. When you do, be sure you have already placed your tools on the ground or on your Styrofoam tray to prevent sparking an electrical charge. Once the cable connected to the negative terminal post has been safely removed, follow the same steps for the positive terminal. Now that both terminals are loose, it's time to unfasten any plate that holds the battery in its seat. Most likely, you'll encounter the same sized nut as the ones found on the terminal cable clamp or a wing nut you can unscrew by hand. Once it's loose, you can now safely remove the battery. Remember, it can be heavy, and you'll likely be hunched over it; be sure to lift with your knees. Lift it straight up -- most batteries come with a handle attached for easy carrying -- and then out and onto the ground. If the handle has corroded, carefully lift the battery by its sides. Be careful not to allow any acid to spill out. With the battery safely away from the car, use your battery terminal cleaner to brush out any remaining sulfate from inside the terminal cable end clamps. Check the cables to make sure they're not corroded. If they are, pick up some replacement cables at the auto parts store. Apply a coating of corrosion protection spray to the cable end clamps to protect from future deposits from accumulating on your new battery. Now you're ready for the last step, installing the new battery. Attaching New Car Batteries Congratulations, you've reached the home stretch. Just a couple more steps and your car should purr like a kitten once more on the first turn of the ignition. Lift the new battery and place it into its seat under the hood. By now, you've likely concluded that new batteries are much heavier than old batteries; be careful when lifting. The battery is an important part to determine whether the car can start normally, but in fact it is not expensive, and it does not need to be specially maintained. We only need to develop good habits in daily use, pay attention to some small details. It is not complicated to disassemble and replace it yourself. However, it should be noted that the anode and the anode must be removed before removing the positive and negative connectors. The opposite is true when installing, to avoid the danger caused by improper operation.
|